Indoor Grow Tent Kit Options and Reviews
Setting up an enclosed indoor space for growing plants does not need to be a complicated process but does require some planning to produce a successful harvest. The most obvious advantage to setting up an enclosed space is the ability to control temperature, humidity, light, and ventilation thus creating the perfect environment for your plants. This will also ensure that your plants will be bug, fungi, and mold free. Before getting started, you will need to determine where you will be putting your growing environment and how much space you have available. Once you have found the perfect spot, you have two options to consider; building your growing space from scratch or purchasing a grow tent kit. We will discuss building your own grow space a little later in this article.
GROW TENT KITS
If you plan on purchasing a grow tent kit, there are several options you can choose from and much will depend on the amount of space you have available and of course how much you are willing or able to spend.

GORILLA GROW TENTS
- Height adjusting roof
- Diamond shaped reflective interior
- All steel interlocking frame
- Industrial strength zippers
- Double cinching ducting ports
- Easy view windows
- Rear access door
- Heavy duty spill tray
- IR blocking roof
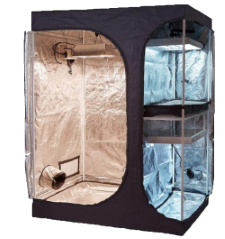
SECRET JARDIN
- Mesh window with removable flap
- Double socks with tightening strings
- 3x lightning holders supporting up to 15kg each (filter included)
- Strap for filter
- Hooks for lighting
- Clips for cables and nets
- Tools pouch with adjustable height
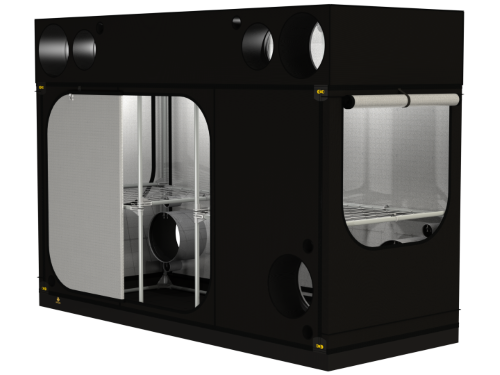
DUAL CHAMBER STEALTH GROW TENT
- 700 Watt MARS II LED System
- 5x4x6.5ft 600D Fusion Hut Mylar Grow Tent (Dual Chamber)
- 4″ Fusion Breath Fan & Filter
- 4″ Ducting
- Aluminum Tape
- Fan Speed Controller
- 120V Digital Timer
- 1 x Hanging Ratchets
Ventilation Options
The actual kit you choose is just one component of the project. The single most important piece of equipment your enclosure will need is a ventilation system. Although this can be as simple as the proper intake and exhaust fans strategically placed within in the tent, without them your plants are vulnerable to pests, mold, and poor or little harvestable final crop yield. Once again price and space will be an important factor. When comparing the types of ventilation fans that are either included in a kit or ones you purchase separately, you need to understand exactly what each one does and how easy they are to set up and use.
Another factor to consider is that the ventilation system you use will depend not only on the size of your enclosure but also on the lights you choose. Depending on the tent size and model, your extractor fan can be mounted inside and suspended on poles from the ceiling. Regardless of how your ventilation system is ultimately set up there are four items that are a must:
- Exhaust fan
- Intake fan
- Duct tape
- Ducting
Extractor Fans (Exhaust Fans) Extractor or exhaust fans play a vital role in maintaining the right temperature and overall environment for your plants. It is best to properly match your ducting size to your specific tent in order to eliminate the need for clamps and reducers. There are a couple of ways to line your ducting. You can fashion it vertically straight to the top with your exhaust fan; just make sure to duct tape it securely. The ducting will need to be run through the hole at the top and, if at all possible, avoid having to make any bends in the ducting. Alternately, you may want to suspend the extractor fan (with a carbon filter attached to it) from the roof.
Another workable solution would be to simply place the filter directly on the floor with the fan on top of it. This way you can then run ducting vertically through the roof. In order to exhaust excess hot air from your tent, you will need to connect the outside ducting to a window or vent. It is also important to create a light breeze inside the tent in order to have adequate air flow throughout. This can be accomplished by either placing oscillating or clip-on fans in the enclosure. It is extremely important that whatever fans you choose, they are not too close to your plants or that they are not too powerful as this could result in your plants suffering windburn. There are numerous types of extractor fans and many greenhouse or enclosed tent structure kits come complete with such fans and are designed specifically to fit that particular tent.
One examples of a very popular extractor fan systems is: Variable Speed Louvered Exhaust Fan
INTAKE FANS Along with the essential exhaust fans, intake fans within your structure are equally as important. The primary goal here is to create the perfect temperature and humidity inside your growing environment. This is done by creating ‘suction’ or negative pressure. When done correctly, you will actually be able to see the walls of your ‘tent’ being sucked inward.
The main key points here are:
- Place your intake fan at ground level – or as close as possible
- It must be connected to an opening (hole) in a corner at the bottom of your structure
- Ensure that your external ducting is securely connected to a fresh air source
Intake fans can either be ‘passive’ or ‘active’. Passive Intake – you simply have a fan that is blowing air out while your intake hole is letting fresh air in. In other words, there is no actual fan bringing air in from the outside. Important points to remember when using this method are:
- The intake hole must be 3 to 4 times bigger than the exhaust hole
- Having more than one passive intake hole
- The holes for new air coming in must be bigger than air that is being pulled out.
An important factor to take into consideration with passive intake is knowing where the air that is coming into your grow environment comes from. To avoid things that can contaminate your plants such as, pollen’s, insects, dust or small animals, it is advisable to install a screen at the intake opening.
Active Intake – Active intake simply means that you have a mechanism (such as a fan) actively pulling oxygen rich air from outside into your growing environment. The difference from an exhaust fan is that intake fans are reversed in position and typically lower in power. When deciding on which intake fan to use, keep in mind that higher quality fans tend to have a longer life and in the long run will save you money by not having to replace it. There are some people that believe putting a fan (such as an oscillating one) helps improve the amount of fresh air being drawn in. It is clear to see that proper ventilation is critical in maintaining adequate air flow and circulation within any enclosed growing environment. Of course, the size of your grow room will play a factor on how much air flow and circulation you require or in other words how big/powerful your fans will need to be. The first thing you will need to do is determine the volume of your space. Calculating the size of your fan It is important to make sure that the size of your fan (ventilation system) fits the size of your enclosure, to do this, simply:
Multiply length x width x height of grow area.
For example: An 8’ x 8’ x8’ room has a volume of 512 cubic feet. An extractor fan needs to be able to exchange the indoor air once every 3 minutes which means that 512 cubic feet/3minutes would equal 171 CFM (cubic feet per minute) Humidity Control It is extremely important to control the humidity within your enclosed grow space. Certain plants require different levels of humidity throughout their grow cycle. An automated humidifier is probably the best and most sensible solution as you can adjust the level when needed. There are a number of diseases that can attack certain plants including mildew and botrytis. Botrytis appears as a gray powdery mold and will form on a variety of plants and can cause many different fungal diseases. While Botrytis is purposely cultivated on certain grapes for very specific wines, it is extremely harmful to most other organic plants. Investing in a humidifier is certainly worth the expense as it can actually mean the difference between a healthy harvest or often non at all. It is important to keep in mind that humidifiers do emit heat so adjusting your temperature control may be necessary.
Some examples of humidifiers that will work in an enclosed grow space include:
hOmeLabs 50 Pint, 2500 Sq. Ft Dehumidifier
Eva-Dry E-333 Renewable Mini Dehumidifier
It’s not difficult to determine just how to keep the right humidity level:
- Plants typically require a gallon of water a day
- A grow space with 20 plants would then need 20 gallons of water a day equalling 120 pints of water input
- This amounts to 5 pints of water an hour
- 1 pint equals 1 pound of moisture
- Thus, a room with 20 plants will require 5 pounds of moisture an hour
HUMIDIFYING In some cases, you may find that there is not enough humidity in your grow space in which case you will require a humidifier to add moisture into the air. Many humidifiers come with a container of some kind to collect the excess water/humidity from the air. Typically, the larger the machine, the more water it will hold. Other humidifiers require no ‘collector’ as they have tubing of some kind that draws water to a drainage system or collection apparatus outside of the enclosure. The water that is collected can also be used to water your plants making it a more eco-friendly system. Unless you are growing flowers, the average temperature of your grow room should be between 70 – 80 °F. Honeywell Cool Moisture Console Humidifier
Some of it’s features are:
- Filtered cool moisture
- Evaporative Technology blows moisture off a wicking filter
- Best for large grow areas with a 3-gallon capacity
- Adjustable Humidistat
- Machine will automatically shut off and on maintaining selected humidity level